Adafruit Mag Tag Set-Up
Last updated: 2022-01-17
MAG TAG
I recently picked up a neat little weekend project– a Mag Tag! A Mag Tag is an ESP32-S2 board with a 2.9" greyscale E-Ink with little magnet feet to stick the board securely to a refrigerator or a metal shelf! 💖
You can read about the Mag Tag and all its features here and if you want the whole kit you can get one here.
Tinkering with this device has been a lot of fun! I love that it can communicate over WiFi so I can do fun stuff with APIs. The eink display is also nice, it is 296x128 pixels; each pixel can be white, light grey, dark grey, or black.


If you’re trying to configure your Mag Tag, I highly recommend using the Adafruit guide! Linked here. And also I also recommend reading esptool documentation linked here.
I found that I needed to give the esptool a few more flags than what I read in the Adafruit guide so I decided to document and share how I got started on an Ubuntu 20.04 LTS machine the best I could. There might be some mistakes in here, and I’m new to the hobby so kindly use the guide from Adafruit as a primary guide and read this post not as advice but as my personal notes on getting started that might contain a few errors, misconceptions, etc.
PROGRAMMING THE MAG TAG
Before doing anything I read the Adafruit guide on getting started with the Mag Tag (linked here), up to the point where the guide tells you to start dragging example CiruitPython example files to run on the Mag Tag.
With this knowledge, before plugging anything in, I checked to see what was in the /dev/ folder– so that once I connected the MagTag I could see a change in available devices.
After connecting the Mag Tag to the computer using a USB-C cable that can transfer data, I checked to see if I could see this new device in /dev/. I could not (yet), which was expected.
To see it, the Mag Tag needs to be in bootloader moder by slow-clicking the Reset button while holding the Boot0 button down.
You really gotta click these buttons in the right way so I’m going to write how to do it in another way just in case that helps anybody. This should be done in the following order:
- Press and hold the Boot0 button down
- Press then release the Reset button
- Now you can release the Boot0 button
Sometimes I would return back to the gif of someone else clicking the buttons in proper sequence the Adafruit guide linked here.
FINDING THE MAG TAG
Okay so after clicking those buttons until you see the lights flash, check to see if the MagTag is available using this command:
$ ls -l /dev/ttyS*
The user guide says that most linux users will probably see the device under /dev/ttyS87. For me the it was /dev/ttyACM0, and could be found using this command:
$ ls -l /dev/ttyA*
crw-rw---- 1 root dialout 166, 0 Jan 10 00:05 /dev/ttyACM0
When I have issues seeing the device in /dev/ I found that it was usually because I was failing to press the Boot0 and Reset buttons in the right way. This is also what was reported by other users as a common issue based on a quick DuckDuckGo search.
USE ESPTOOL TO PROGRAM THE ESP CHIP
The following command was used to communicate with the Mag Tag using esptool:
$ sudo python3 -m esptool --port /dev/ttyACM0 -b 912600 -c 'esp32s2' chip_id
esptool.py v3.2
Serial port /dev/ttyACM0
Connecting...
Chip is ESP32-S2
Features: WiFi, No Embedded Flash, No Embedded PSRAM, ADC and temperature sensor calibration in BLK2 of efuse V1
Crystal is 40MHz
MAC: mac_addr
Uploading stub...
Running stub...
Stub running...
Changing baud rate to 912600
Changed.
Warning: ESP32-S2 has no Chip ID. Reading MAC instead.
MAC: mac_addr
WARNING: ESP32-S2 chip was placed into download mode using GPIO0.
esptool.py can not exit the download mode over USB. To run the app, reset the chip manually.
To suppress this note, set --after option to 'no_reset'.
Sometimes this command didn’t work for me– here is an example of what I saw when the Mag Tag failed to enter the bootloader:
$sudo python3 -m esptool --port /dev/ttyACM0 chip_id
esptool.py v3.2
Serial port /dev/ttyACM0
Connecting....
Detecting chip type... Unsupported detection protocol, switching and trying again...
Connecting...
Traceback (most recent call last):
  File "/usr/local/lib/python3.8/dist-packages/esptool.py", line 377, in detect_chip
    res = struct.unpack("<IBBBBBBBBI", res[:16])  # 4b flags, 1b flash_crypt_cnt, 7*1b key_purposes, 4b chip_id
struct.error: unpack requires a buffer of 16 bytes

During handling of the above exception, another exception occurred:

Traceback (most recent call last):
  File "/usr/lib/python3.8/runpy.py", line 194, in _run_module_as_main
  [...trimmed output :) ...]
OSError: [Errno 71] Protocol error
While the output would change sometimes slightly, the error message was always the same: OSError: [Errno 71] Protocol error.
The solution to this was to try re-pressing the Boot0 and Reset buttons again and again with slight variations in timing until the command returned information. 🙃
Installing the Firmware Binary
After talking to the esp32s2 chip using esptool its time to download the CircuitPython binary and UF2 files provided by Adafruit linked here.
After navigating to the directory that contains these files, I used the following command to upload the CircuitPython binary file:
$sudo python3 -m esptool --port /dev/ttyACM0 --after=no_reset write_flash 0x0 CircuitPython7_1_0/adafruit-circuitpython-adafruit_magtag_2.9_grayscale-en_US-7.1.0.bin
esptool.py v3.2
Serial port /dev/ttyACM0
Connecting...
Detecting chip type... Unsupported detection protocol, switching and trying again...
Connecting...
Detecting chip type... ESP32-S2
Chip is ESP32-S2
Features: WiFi, No Embedded Flash, No Embedded PSRAM, ADC and temperature sensor calibration in BLK2 of efuse V1
Crystal is 40MHz
MAC: mac_addr
Uploading stub...
Running stub...
Stub running...
Configuring flash size...
Flash will be erased from 0x00000000 to 0x00151fff...
Compressed 1384112 bytes to 901260...
Wrote 1384112 bytes (901260 compressed) at 0x00000000 in 15.3 seconds (effective 724.5 kbit/s)...
Hash of data verified.

Leaving...
Staying in bootloader.
The install was very short, about a minute or less. After clicking the Reset button on the Mag Tag, the bootloader code for Circuit Python Magtag v7.1.0 that was just programmed is launched. Four (4) neopixel lights on the front of the MagTag briefly flash red then turn solid green and I hear and see a notification for a newly mounted device: MAGTAGBOOT.

Navigate to the MAGTAGBOOT device. You’ll see three files:
- CURRENT.UF2
- INDEX.HTM
- INFO_UF2.TXT
Installing the UF2 Booloader
Now I need to upload the U2F loader, the drag and drop bootloader from Adafruit. I grab the U2F file by unzipping the TinyUF2 release package tinyuf2-adafruit_magtag_29gray-0.8.0.zip found here. Then I unzipped the downloaded file to extract the combined.bin file.
I accessed the bootloader again by holding the Boot0 button down and clicking the Reset button. I see the MAGTAGBOOT device unmount. Run this command to confirm the connection to /dev/ttyACM0:
$ sudo python3 -m esptool --port /dev/ttyACM0 -b 912600 -c 'esp32s2' chip_id
Once a successful connection is seen– double-click the Reset button on the Mag Tag to launch the bootloader. Again, it may take a few tries before you get the timing right. You’ll see the device flash red and then remain green again once completed.
We’re ready to load the second bootloader using the following command:
$sudo python3 -m esptool --port /dev/ttyACM0 write_flash 0x0 combined.bin
esptool.py v3.2
Serial port /dev/ttyACM0
Connecting...
Detecting chip type... Unsupported detection protocol, switching and trying again...
Connecting...
Detecting chip type... ESP32-S2
Chip is ESP32-S2
Features: WiFi, No Embedded Flash, No Embedded PSRAM, ADC and temperature sensor calibration in BLK2 of efuse V1
Crystal is 40MHz
MAC: mac_addr
Uploading stub...
Running stub...
Stub running...
Configuring flash size...
Flash will be erased from 0x00000000 to 0x002f2fff...
Compressed 3090400 bytes to 110203...
Wrote 3090400 bytes (110203 compressed) at 0x00000000 in 21.0 seconds (effective 1178.0 kbit/s)...
Hash of data verified.

Leaving...
WARNING: ESP32-S2 chip was placed into download mode using GPIO0.
esptool.py can not exit the download mode over USB. To run the app, reset the chip manually.
To suppress this note, set --after option to 'no_reset'.
Once the U2F has been loaded onto the booloader, hit the Reset button. I now see MAGTAGBOOT on disk again. Okay, nearly done, now I need to drag the PythonCircuit U2F file onto the board: adafruit-circuitpython-adafruit_magtag_2.9_grayscale-en_US-7.1.0.uf2 . Once the data is finished transferring, the device will restart and remount itself. The attached Mag Tag device is now called CIRCUITPY.
WHAT GETTING STARTED WITH MAG TAG LOOKS LIKE
Woo! I can now start coding. The Mag Tag can now be dynamically updated using the files populated in this the top-level folder for CIRCUITPY. The Mag Tag will run any code in the file code.py or main.py.
Okay so now its time to download the latest CircutPython Library Bundle from here: https://circuitpython.org/libraries
Before I can program a CircuitPython file, I’ll need to locally install CircuitPython dependencies. After creating a new folder within CIRCUITPY called lib/, I copied the following folders and files to CIRCUITPY/lib/:
- adafruit_display_text
- adafruit_magtag
- adafruit_miniqr.mpy
- adafruit_requests.mpy
- neopixel.mpy
- simpleio.mpy
Don’t worry too much about having missing libraries. You will see an error message telling you which library is missing. Here is an example of what it looks like when the Mag Tag is trying to run code with a missing adafruit_request.mpy library.

The Adafruit guides begins with a CircuitPython Internet Test example, linked here. It was super quick to get up and running. Just drag the sample files over and configure them to use the segmented network in use for IoT devices.
At the end of the Adafruit guide I walked away with some experience loading firmware and bootloaders using esptool.
Here are a few fun projects that come as example code out-of-the-box from the CircuitPython Library.
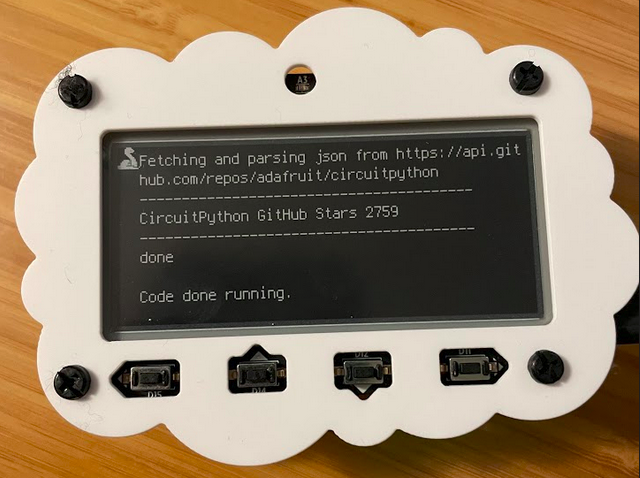
 Pictured Above: Wifi Test linked here
 Pictured Above: display_shapes_simpletest_magtag.py
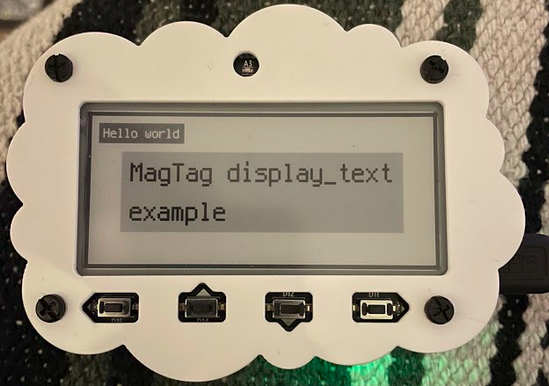 Pictured Above: display_text_magtag.py
 Pictured Above: magtag_simpletest.py
 Pictured Above: pybadger_simpletest.py
 Pictured Above: progressbar_magtag_simpletest.py